As we had some guests round on Tuesday, we opened one of the half bottles of Strawberry wine, os that the girls could have a glass each with their meal:
(Please forgive the quality of the last few images on here - my camera is still full of holiday pictures and I keep having to delete pictures to make just enough space for the odd beer blog picture. They all looked ok on the little camera screen, but I didn't have the space to take 2 or 3 like I normally would, just in case.)
After only a few days, its no surprise the wine tasted much as it did on bottling day. Its definitely not a wine lovers wine, but its sweet and tasty, though still with a very slight chemically after taste. It certainly went down very well with the girls.
Wednesday, April 30, 2008
Tasting the Strawberry Wine
Adding the hops to the Bitter
So, 3 days after I kicked off the Sherwood Forest Bitter, it is time to add the bag of hops. I stupidly added them before taking a picture, but it was basically a small seal bag, about the size of a couple of postage stamps next to each other, full of what looked like a dark cat litter - mmm, nice.
I sprinkled the contents into the beer and, having poured boiling hot water over the stirrer, I stirred them in. Initially, they mostly stayed on the surface, but I'm sure I recall reading that aerating the wort during the early stages of fermentation is not a problem, so I made my best effort to stir them all off the surface. Job done. Hopefully this will add a little more flavour to the final beer.
Prior to adding the hops, I did take a gravity reading: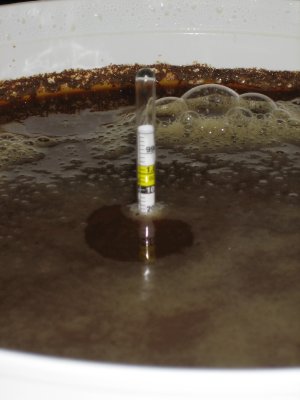
I took the reading as being about 1.020 - not too bad after 3 days. I will now leave it for at least another 3 or 4 days before taking another reading. I am now keen to not leave any brews for more than a few days once fermentation has stopped.
Sunday, April 27, 2008
Tasting the Merlot
As intented, with today's Sunday lunch, I had a glass of the Merlot that I bottled yesterday.
As you can see, it looks the part. Tastes pretty good too :-)
I am really pleased to report that this is definitely a decent quality Merlot. I'm very pleasantly surprised. It already has a complex, fairly deep flavour with a pleasant oaky after taste. There is a very very minor chemically taste right at the end, but I'm sure this will fade completely as the wine matures. If the flavour improves further it really will be a great wine.
Getting the Beaverdale Chablis Blush going
My final task for the weekend was to get a second wine going. I have had this kit for quite a while now. I got it with the first lot of wine gear, so its about time I got it going.
I emptied the bag of grape juice into the demijohn and rinsed out the bag with water and poured that in too. I filled the rest of the demijohn with a mix of cold and boiled water in order to keep the temperature of the wine at about 20 degrees. I shook it well and measured the gravity to check it was fully mixed. It was about 1.080, matching the target of 1.075-1.080.
I was told this was a Rose but it looks pretty dark at the moment - I therefore ignore the "white wine only" instruction to add the Bentonite. I did add the oak chippings and then the yeast and gave the demijohn a good shake until my arms hurt. I then poured a little extra water into the demijohn to wash all the yeast and chippings that had stuck to the mouth of the demijohn into the wine. However, I got a bit carried away and filled the demijohn up a little higher than I should have done. Hopefully this won't be a problem.
I finally put the airlock in the top and placed the wine in the brewery.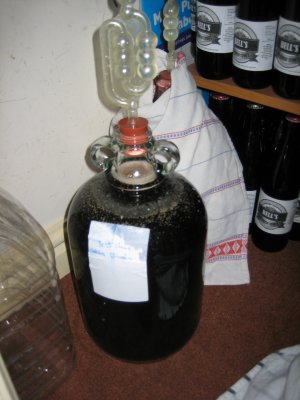
Unlike the Plum, this can now be left alone for 2 to 3 weeks while fermentation completes.
Brewing up a Plum Wine
After a quick taste of the recently bottled Strawberry wine suggested it would be a very pleasant summer tipple, the missus persuaded me to kick off another. She picked a plum this time. Starting it brewing began by pouring the contents of the tin of grape juice into a sanitized demijohn and adding 1.8 litres (3 pints) of cold water. I then dissolved 450g (16oz) of granulated sugar in 0.6 litres of boiling water. (I actually did this in 2 batches as I didn't have a large enough jug to do it in one), and added this to the demijohn. Finally I added the wine yeast and nutrafine sachets and shook the demijohn as vigourously as I could. I also tested the strength of the demijohn by dropping it in the sink - its pretty strong ;-) .
I finally added the airlock and placed the wine in the brewery. In 3 days I need to top up the level to the 4.5 litre mark with tepid water.
Brewing up a Sherwoods Forest Bitter
After bottling the stout I took a trip to the homebrew shop while the fermentation bucket was soaking. I had intended to buy a lager style beer ready for the summer, but for no reason at all the missus pointed this box out so I figured - why not. I am keen, for now at least, to stick to two tin kits where no sugar is required.
The kit didn't take long to get going. I emptied the two tins into the bucket and added a kettle and a half of boiling water to the bucket, via the tins to rinse them out. I stirred this for some time until all the wort was dissolved. I then filled up the rest of the bucket with cold water, before checking the temperature, and then adding the yeast. This again became very lumpy, but with another really good stir they finally all broke down. I popped the top on the bucket and carried it into the brewery.
In 3 days time I will add the hops. There were two options for adding the hops - either boil it to add extra bitterness, or simply add it to the wort on day three. Given the amount of home brewing I had done by this point I went for the easy option. It will be interesting to see how this comes out, and whether it misses a bit of bite.
Bottling the Beaverdale Merlot
After yet more bottle cleaning, I was ready to bottle the Merlot that had been clearing. Having had issues when syphoning the Strawberry, I bought a new syphon from the homebrew shop. I also attached an extra length of tube to the tap, so that this could be fed to the bottom of the bottle, as well as meaning the tap was no longer the last part of the syphon.
I followed the same method I used for the Strawberry, and I'm pleased to say that with the new syphon, it went very well. Again I had knocked up some labels to imprive the bottles appearance, as well as to identify the wine.
With the win bottled, corked and labelled I placed it on the rapidly filling wine shelf in the brewery. I only managed to get the equivalent of 5 full sized bottles of wine, which is one whole bottle less than i should have done. This is quite a hit on such a small amount of wine. I did actually get a further quarter of a bottle, which I am looking forward to having with my Sunday lunch today :-)
Bottling the John Bull Masterclass Irish Stout
The next task for the weekend was getting the Stout bottled. Having got the laborious job of cleaning all the bottles done, I added 60 grams of sugar to some freshly boiled water and stirred it until it was dissolved. I went for 60 in the hope it would come out a little less fizzed than my previous brews as I thought this would better suit a stout. I then very gently mixed this into the stout, and left it to settle.
While I left the beer to allow the sediment to settle down again, I set about knocking up some quick labels. I was happy to keep them fairly similar to previous ones:
Once these had been designed, printed and cut down to size, I was ready to bottle. I went for the same setup as I had done previously, with the beer on the kitchen side and a tube attached to the tap, bottles lined up along side the capper and caps, labels, milk and a brush. The process went very smoothly, leaving me with 45 bottled John Bull Masterclass Irish Stouts.
After filling the last bottle, I filled a small glass with the dregs. Even flat, and a fraction cloudy, this smelt and tasted wonderful. It had a delicious deep coffee flavour. If the final brew tastes as good as this glass, this will be an awesome beer.
Saturday, April 26, 2008
Bottling the Strawberry Wine
At last I finally had a free weekend, so I had lots of brew related stuff to do. I started by bottling the Strawberry wine which has been clearing for about a month. I had already knocked up some labels:
As it had been my girlfriend who had wanted me to brew this wine, I decided she could take pride of place on the label.
So, back to the bottling. I soaked 3 full sized wine bottles, 6 half sized bottles and 3 third sized bottles in sanitising solution. I shouldn't need them all, but i wanted to be prepared just in case. I rinsed these, lifted the demijohn onto the kitchen side and inserted the syphon. The syphon had a tap at the end, and I didn't have any tubing to put on the end of this and insert into the bottles, so I decided I would just insert the end of the tap in the bottle and hold it on the edge to minimise bubbles. I started the syphon with a quick suck, and we were off.
The first bottled filled without any problems at all. I had previously purchased a corker, but this would be the first time I used it, so wasn't sure how easy it would be.
I had already placed some corks in a bowl of warm water to soften, so I inserted one of these into the corker, placed the pincers over the top of the bottle, and squeezed the handles. Effortlessly the cork went into the bottle. Easy :-)
I continued with the next two bottles without any problems. However, the forth bottle wouldn't fill. The syphon stopped sucking wine through, and even another suck on the end of the tube couldn't get it going again. This was a real pain given I was dealing with such a small amount of wine (compared to the beer) and I really didnt want to damage over half the batch. I decided to remove the tap and see if it would come through better. It did, but too quickly now. It raced into the bottle filling a full-sized in a couple of seconds. I tried to stem the flow by squeezing the tube, but this just increased the speed the wine came out at, so I grabbed the next bottle and filled that. I continued until the wine dropped below the level of the syphon in the demijohn. All of the wine filled without the tap was massively aerated of course. I'm really hoping this doesn't adversely affect the wine too much. I had a taste of the wine that was syphoned without problems and it tasted great. It wasn't a very strong strawberry taste, but it was a lovely subtle and light rose style wine. It would be horrible if half the batch was ruined. I did taste some from the aerated batch, and this too tasted ok so fingers crossed. When I tried to lower the syphon in the demijohn to bottle the last bit I only succeeded in disturbing all the sediment, so I called it a day with the equivalent of 5 full bottles filled.
Having corkered all the bottled I then attached the labels and placed the bottles on the wine shelf (well it is now) in the brewery.
Wednesday, April 23, 2008
Tasting the IPA
My first brew has now had over two months in the bottle. After throwing away the Light as detailed in the post below, I decided to see how the IPA is now. I opened one of the beers bottled in the cheap lager bottles (and my initial suspicions with these bottles is that they don't develop the flavour quite as well as the thicker bottles, but its too earlier to tell really - and Im not sure if there could be any logical reason for this). The initial sweetness had mellowed nicely, so while still a little sweet, it is no longer overly so. It is definitely a refreshing summer beer. There is a noticeable subtle taste that reflects the fine flavour Phil's IPA produced, but mine doesn't have the depth or breadth of flavours he produced from the same kit.
Overall, I'm not too disappointed with this brew. I was my first brew, it suffered from major temperature problems because of the heating issues in my house, and it has still produced something pleasant and drinkable.
The real test will be of the stout that I will hopefully bottle at the weekend - another brew where Phil and I have done the exact same brew. If this one doesn't turn out similar to Phil's, I will start playing around with my brewing, warm week and maturing temperatures to see if I can improve the final product.
Tasting the Linthwaite Light
Oh dear :-( Phil and I cracked open the first 2 bottles of the 3 week old Linthwaite Light. It is not good. I find it hard to describe it, other than to say it had a very cheap beer taste and smell. There was a, perhaps yeasty, taste that hits you almost before its even in your mouth and then very little else after that. Phil politely finished his pint, but I ended up chucking mine down the sink. It doesn't really have much of a green taste so Im not even that hopeful tat it will improve dramatically with age, but I shall leave it well alone now for probably another month and see if anything good comes of it. (My judgement probably wasn't helped by having just finished a bottle of Phil's Colne Valley which was really good, and having just returned from a trip to Brussels and all the fine beer that comes with that.)
[edited]
I forgot to mention that this was the brew that spent 6 weeks in the fermenter - I don't know if this could be part of the problem with this brew.
Monday, April 14, 2008
Checking for movement on the Stout
Having got back from a weekend away, I decided to do a quick check on the Stout, to check that the gravity was still falling: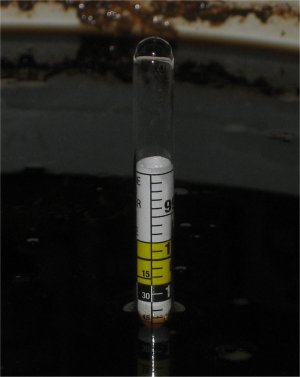
Disappointedly, I took this to be another reading of 1.013 meaning no more movement. I know Phil got down to 1.012 and ideally I'd like to be a fraction lower, therefore I gave the brew a gentle stir for a minute and will give it another reading in a couple of days.
I did take a bit of a risk with the stirrer - given it never fits in the sink properly anyway, and Im never convinced the kitchen sink is likely to be bacteria free, I opted to carefully pour a full kettle of boiling water over the stirrer, rather than soaking it in sanitising solution. I hope this will be fine.
I did note that the Stout already had a very strong smell. Given my poor sense of smell I couldn't put my finger on what it was - though it wasn't particularly unpleasant. My missus could smell if from the next room within 30 seconds of me taking the top of the bucket it was so strong. There was also a slight but noticeable greasy residue on the surface of part of the beer. Hopefully this is nothing untoward.
Wednesday, April 9, 2008
Checking on the John Bull Stout
I recently did some research into whether the 6 weeks that my previous brew spent in the fermenting bucket was too long (mostly on Jims Beer Forum - see my blogroll). It is clear that while modern yeast should be fine for up to a couple of months all being well, its certainly not advisable. I'm therefore keen to bottle my brews from now on as soon as they are finished fermenting. Therefore after a week and a half I wanted to take a look how the stout is doing:
I measured the gravity at 1.013. I didn't take an original gravity reading as I was kicking it off in a rush, but this seems pretty close already to where it needs to be. I know Phil (see my blog roll) recently bottled this same brew at 1.012. (We had a first taste of it yesterday and despite tasting a little green still, its already good after just a month.)
I will take another reading of my stout sometime in the near future , and if it hasn't moved further I will give it a gentle stir and the bottle once it is definitely not moving any further.
Subscribe to:
Posts (Atom)
 RSS feed